How I created my website
Steps to develop an academic-theme website using R (No HTML, JavaScript, or CSS)
Whether one needs a personal website for professional growth is out of the question. Of course, we need it. Instead, the question is: how attractive and elegant is the website? Being a Ph.D. student, it’s not a surprise that I find an academic-theme website very attractive. Developing such a website from the scratch needs huge time and effort. Luckily, there are open source templates such as Hugo templates. Recently I created my website using such a template. Below is a blurred screenshot of the site.

What I like about the website are:
- It is simple in design, attractive in appearance, and elegant in presentation.
- Easy to customize if you know R.
- HTML, JavaScript, or CSS knowledge is NOT necessary.
- The code is maintained as a repository in Github. As a result, it’s easy to edit or update the site.
- The site has been deployed in Github, no need to buy a domain name. It is also easy to deploy the site in a custom domain name.
- It offers a simple and powerful personal blogging feature.
- Seamlessly rendered in computers, cell-phones, iPads, and other devices.
Though the Hugo academic template was fairly simple, first I had to figure out how to use it and then how to customize it. I started by looking into the blog posts by Alison Hill, Leslie Myint, and Ming Tang. While each of these blogs was helpful, the actual development was slightly different because things have changed since their publications. Here I share how I used and personalized the template.
I divide the website development into four steps.
Step-1: Requirement gathering
- I have R and RStudio installed on my computer. Working knowledge of R coding is necessary.
- Installed blogdown package in R. The book blogdown: Creating Websites with R Markdown is a good resource to know the basics related to this website development.
- Installed GO language on the computer.
- I have a Github account. Working knowledge of Github is necessary.
Step-2: Just running a template site
-
I forked the starter-academic repository on my Github account. Alternatively, one can create a repository using starter-academic as a template.
-
Renamed the repository to alorchhota.github.io from Settings. Please note the name format here: [myaccountid].github.io. This name format would be useful later to deploy the website. Here is my repository – you may take a look if you like.
-
Cloned the repository on my local computer using Terminal.
git clone https://github.com/alorchhota/alorchhota.github.io # remember to use your repository -
Opened the repository in RStudio as a new package (from an existing directory). There I loaded the blogdown package and installed Hugo.
library(blogdown) blogdown::install_hugo() -
Restarted RStudio – required for loading the updated
$PATHvariable. -
In Rstudio, I built the template website, and start the server.
library(blogdown)
build_site()
# hugo: downloading modules …
# hugo: collected modules in 15019 ms
# Start building sites …
#
#                    | EN
# -------------------+-----
#   Pages            | 52
#   Paginator pages  |  0
#   Non-page files   |  7
#   Static files     |  3
#   Processed images | 39
#   Aliases          | 12
#   Sitemaps         |  1
#   Cleaned          |  0
#
# Total in 26388 ms
serve_site()
# Launching the server via the command:
#   C:/Users/Shatil/AppData/Roaming/Hugo/0.80.0/hugo.exe server --bind 127.0.0.1 -p 4321 --themesDir themes -D -F --navigateToChanged
# Serving the directory . at http://localhost:4321
# Launched the hugo server in the background (process ID: 9296). To stop it, call blogdown::stop_server() or restart the R session.
At this point, the template website was visible in the RStudio Viewer panel (see the image below).

When I clicked on the button as marked by a red circle, the website opened in a web browser. Generally, the website updated updated each time I saved any change. Occasionally, I needed to stop the site by calling
stop_server(), and then restart by callingbuild_site()andserve_site()manually.
Step-3: Personalizing the site
The variables in the template repository are pretty self-explanatory and need no explanation. So, instead of describing every variable change, here I mention only the notable changes. You are welcome to visit my repository to see all changes.
-
Updated the title and copyright in the file:
config/_default/config.tomlkeeping everything else unchanged.# Title of your site title = "Ashis Saha" # The URL of your site. # End your URL with a `/` trailing slash, e.g. `https://example.com/`. baseurl = "" # Enter a copyright notice to display in the site footer. # To display a copyright symbol, type `©`. For current year, type `{year}`. copyright = "© 2020 Ashis Saha" -
Deleted the demo file:
content/home/demo.md. -
Updated
content/authors/admin/_index.mdwith personal information. Notably, I updated my name, changed the google-scholar icon, and added about-me. I also set highlight_name: true to highlight my names in publication-author lists.--- # Display name title: Ashis Saha # ... social: - icon: google-scholar icon_pack: ai link: https://scholar.google.co.uk/citations?user=e6Ku7IIAAAAJ # ... # Highlight the author in author lists? (true/false) highlight_name: true --- I am a Ph.D. student advised by ... -
Replaced the
content/authors/admin/avatar.jpgfile with my profile picture. -
Copied my CV (Ashis_Saha_CV.pdf) in
static/media/folder and updatedcontent/authors/admin/_index.mdfile to include the CV.# Link to a PDF of your resume/CV. # To use: copy your resume to `static/media/resume.pdf`, enable `ai` icons in `params.toml`, # and uncomment the lines below. - icon: cv icon_pack: ai link: media/Ashis_Saha_CV.pdf -
Deleted a few files from
content/homefolder:skills.md,accomplishments.md, andtags.md. You may keep them if you like. -
Updated
content/home/experience.md. -
Commented out
content:anddesign:incontent/home/contact.md.# content: # # Automatically link email and phone or display as text? # autolink: true # # # Email form provider # form: # provider: netlify # formspree: # id: # netlify: # # Enable CAPTCHA challenge to reduce spam? # captcha: false # # design: # columns: '2' -
Updated email, phone number and address in
config/_default/params.toml. Also commented out a few social links which are already available below the profile picture.# Enter contact details (optional). To hide a field, clear it to "". email = "****@***.com" phone = "+1-***-***-****" # Address # For country_code, use the 2-letter ISO code (see https://en.wikipedia.org/wiki/ISO_3166-1_alpha-2 ) address = {street = "*** St, Apt ***", city = "***", region = "MD", postcode = "*****", country = "United States", country_code = "US"} # Geographic coordinates # To get your coordinates, right-click on Google Maps and choose "What's here?". The coords will show up at the bottom. # coordinates = {latitude = "37.4275", longitude = "-122.1697"} # Directions for visitors to locate you. # directions = "Enter Building 1 and take the stairs to Office 200 on Floor 2" # Office hours # A list of your office hours. To remove, set to an empty list `[]`. # office_hours = ["Monday 10:00 to 13:00", "Wednesday 09:00 to 10:00"] # Enter an optional link for booking appointments (e.g. calendly.com). # appointment_url = "https://calendly.com" # Contact links # Set to `[]` to disable, or comment out unwanted lines with a hash `#`. #contact_links = [ # {icon = "twitter", icon_pack = "fab", name = "DM Me", link = "https://twitter.com/Twitter"}, # {icon = "skype", icon_pack = "fab", name = "Skype Me", link = "skype:echo123?call"}, # {icon = "keybase", icon_pack = "fab", name = "Chat on Keybase", link = "https://keybase.io/"}, # {icon = "comments", icon_pack = "fas", name = "Discuss on Forum", link = "https://discourse.gohugo.io"}, # # {icon = "telegram", icon_pack = "fab", name = "Telegram Me", link = "https://telegram.me/@Telegram"}, # ] -
Reordered the menu items by changing the weight values in
config/_default/menus.toml. Smaller weights appear leftward.[[main]] name = "Home" url = "#about" weight = 10 [[main]] name = "Experience" url = "#experience" weight = 20 [[main]] name = "Publications" url = "#featured" weight = 30 # ... -
Right-aligned the menu items using
alignparameter ofmain_menuinconfig/_default/params.toml.############################ ## Advanced ############################ # Main menu alignment (l = left, c = center, r = right) and logo options. main_menu = {align = "r", show_logo = true, highlight_active_link = true, show_language = false, show_day_night = true, show_search = true} -
Reordered the sections by setting appropriate weight values in
*.mdfiles incontect/home/folder. Smaller weights appear at the top. An example incontent/home/publications.mdfile is shown below.# Order that this section appears on the page. weight: 50 title: Recent Publications subtitle: '' -
For each publication, I duplicated the existing
examplefolder incontent/publication/. In each folder, I kept only one file (index.md) and edited it. I ensured usingadminas my name to highlight my name in the author list. For manuscripts, posters, or slides, I created sub-folders instatic, copied necessary files there, and used their links inurl_pdf,url_poster, orurl_slidesvariables, respectively. An exampleindex.mdfile is shown below.--- title: "Co-expression networks reveal the tissue-specific regulation of transcription and splicing" # Authors # If you created a profile for a user (e.g. the default `admin` user), write the username (folder name) here # and it will be replaced with their full name and linked to their profile. authors: - admin - Yungil Kim - Ariel D.H. Gewirtz - Brian Jo - Chuan Gao - Ian C. McDowell - The GTEx Consortium - Barbara E. Engelhardt - Alexis Battle date: "2017-10-11T00:00:00Z" doi: "" # Schedule page publish date (NOT publication's date). publishDate: "2017-01-01T00:00:00Z" # Publication type. # Legend: 0 = Uncategorized; 1 = Conference paper; 2 = Journal article; # 3 = Preprint / Working Paper; 4 = Report; 5 = Book; 6 = Book section; # 7 = Thesis; 8 = Patent publication_types: ["2"] # Publication name and optional abbreviated publication name. publication: In *Genome Research* publication_short: In *Genome Research* abstract: Gene co-expression networks capture biologically important patterns in gene expression data, enabling functional analyses of genes, discovery of biomarkers, and interpretation of genetic variants. Most network analyses to date have been limited to assessing correlation between total gene expression levels in a single tissue or small sets of tissues. Here, we built networks that additionally capture the regulation of relative isoform abundance and splicing, along with tissue-specific connections unique to each of a diverse set of tissues. We used the Genotype-Tissue Expression (GTEx) project v6 RNA sequencing data across 50 tissues and 449 individuals. First, we developed a framework called Transcriptome-Wide Networks (TWNs) for combining total expression and relative isoform levels into a single sparse network, capturing the interplay between the regulation of splicing and transcription. We built TWNs for 16 tissues and found that hubs in these networks were strongly enriched for splicing and RNA binding genes, demonstrating their utility in unraveling regulation of splicing in the human transcriptome. Next, we used a Bayesian biclustering model that identifies network edges unique to a single tissue to reconstruct Tissue-Specific Networks (TSNs) for 26 distinct tissues and 10 groups of related tissues. Finally, we found genetic variants associated with pairs of adjacent nodes in our networks, supporting the estimated network structures and identifying 20 genetic variants with distant regulatory impact on transcription and splicing. Our networks provide an improved understanding of the complex relationships of the human transcriptome across tissues. # # Summary. An optional shortened abstract. # summary: Lorem ipsum dolor sit amet, consectetur adipiscing elit. Duis posuere tellus ac convallis placerat. Proin tincidunt magna sed ex sollicitudin condimentum. tags: [] # Display this page in the Featured widget? featured: true # Custom links (uncomment lines below) # links: # - name: Custom Link # url: http://example.org url_pdf: 'paper/twn.pdf' url_code: 'https://github.com/battle-lab/twn_tsn' url_dataset: 'https://gtexportal.org/home/datasets#filesetFilesDiv76' url_poster: '' url_project: '' url_slides: '' url_source: '' url_video: '' # Featured image # To use, add an image named `featured.jpg/png` to your page's folder. # image: # caption: 'Image credit: [**Unsplash**](https://unsplash.com/photos/pLCdAaMFLTE)' # focal_point: "" # preview_only: false # Associated Projects (optional). # Associate this publication with one or more of your projects. # Simply enter your project's folder or file name without extension. # E.g. `internal-project` references `content/project/internal-project/index.md`. # Otherwise, set `projects: []`. # projects: # - example # Slides (optional). # Associate this publication with Markdown slides. # Simply enter your slide deck's filename without extension. # E.g. `slides: "example"` references `content/slides/example/index.md`. # Otherwise, set `slides: ""`. # slides: crossmap --- -
Changed
viewincontent/publication/_index.md.# View. # 1 = List # 2 = Compact # 3 = Card # 4 = Citation view: 4 -
Changed
viewincontent/home/featured.md.design: # Choose a view for the listings: # 1 = List # 2 = Compact # 3 = Card # 4 = Citation (publication only) view: 4 -
To add one more menu item (Extracurricular), first added a menu entry in
config/_default/menus.tomlwith a url and a weight to determine the order.[[main]] name = "Extracurricular" url = "#extracurricular" weight = 55Then, I added the file
extracurricular.mdfile incontect/home/with necessary contents in R mark down format.--- widget: blank headless: true # This file represents a page section. headless: true # Order that this section appears on the page. weight: 120 title: Extracuricular Activities subtitle: '' design: # Choose how many columns the section has. Valid values: 1 or 2. columns: '2' --- ### Badhan (a voluntary blood donors' organization) ... -
To create a blog post, I duplicated the existing
getting-startedfolder incontent/post, replacedfeature.jpgwith a preview image, and editedindex.mdinside the folder.--- title: How I created my website subtitle: Steps to build and deploy an academic-theme website. # Summary for listings and search engines summary: Steps to build and deploy an academic-theme website. # Link this post with a project projects: [] # Date published date: "2021-01-26T11:00:00Z" # Date updated lastmod: "2021-01-26T11:00:00Z" # Is this an unpublished draft? draft: false # Show this page in the Featured widget? featured: false # Featured image # Place an image named `featured.jpg/png` in this page's folder and customize its options here. image: caption: 'Blurred screenshot of the website' focal_point: "" placement: 2 preview_only: true authors: - admin tags: - Academic - Website - How to categories: - Tutorial --- Whether one needs a personal website ...Note: if
draft: true, the post will be shown only locally, but not publicly. -
To facilitate readers' comments, I first signed up in Disqus, created a site with a shortname, and then updated
engineandshortnameinconfig/_default/params.toml.############################ ## Comments ############################ [comments] # Comment provider: # 0: Disabled # 1: Disqus (https://disqus.com) # 2: Commento (https://commento.io) engine = 1 # Which page types are commentable? commentable = {page = true, post = true, docs = true, project = true, publication = true, talk = true} # Configuration of Disqus. [comments.disqus] shortname = "alorchhotagithubio" # Paste the shortname from your Disqus dashboard. show_count = true # Show comment count in page header? (true/false) # Configuration of Commento. [comments.commento] # If self-hosting Commento, enter its URL here (e.g. "https://commento.?.com"), otherwise leave empty. url = ""
Step-4: Hosting and deployment
There are many different ways to host and deploy a website. Github provides free hosting. Deploying a site using Github Pages is easy – which I used here. For further details, you may look here or here.
-
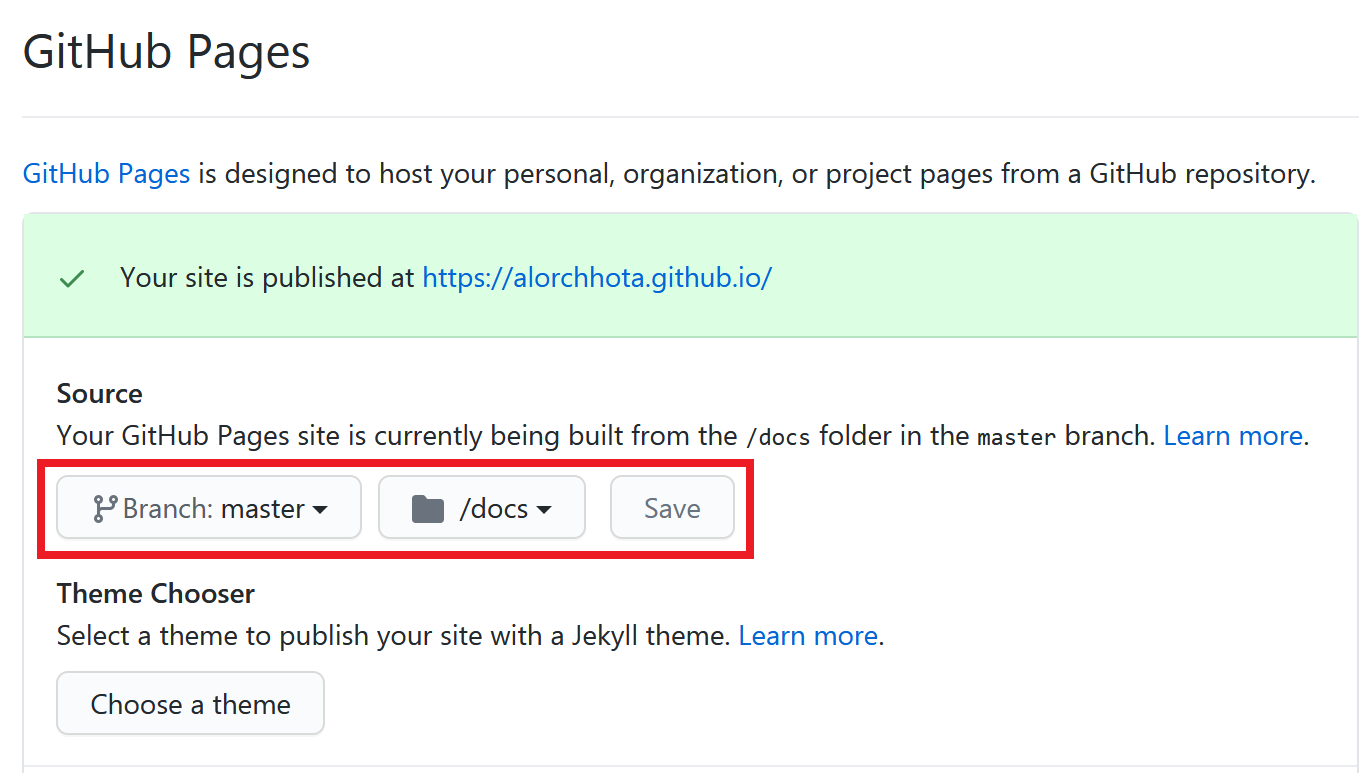
On the Github website, I went to Settings of my repository, scrolled to the Github Pages section, and set master branch + /docs folder as the source. Consequently, my site was published at https://alorchhota.github.io/.
Note:
- The repository must be public to use Github Pages for free.
- The site address would be different if the repository name were different.
-
In RStudio, I changed
publishDirinconfig/_default/config.toml.############################ ## Advanced options below ## ############################ # Publish website in docs directory to host on github pages publishDir = "docs" -
Built the website to publish. Notice
hugo_cmd()function.stop_server() # when server is running build_site() blogdown::hugo_cmd(c("-b", "https://alorchhota.github.io/")) # change site url serve_site() -
Finally, after checking if the site was rendered correctly on the local computer, I committed all the changes in the repository and pushed the code to the remote server from Terminal.
git add .
git commit -m "deploying site"
git push
The website should be publicly available at the Google Pages site url in a few minutes.
I hope this post makes website development easy for people with some knowledge of R.
Ashis Saha
Principal Scientific Researcher
My research interests include computational biology and machine learning.